


I’ve had a few queries about my unusual table top in my recent post about Router Tables. So to cause a bit of controversy, here is the article I wrote at the time about the modification. To clarify however, I still use an original, unmodified Triton Router Table quite successfully, so this is another one of those “I’ll always try to modify everything kind of thing!”
**************************************************************************************
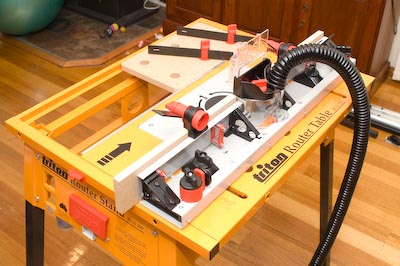
I have been using the Triton Router Table for a few years now (with the Triton Router pretty much permanently mounted), and have found it to be an excellent way of performing most router operations. In fact, other than some totally unavoidable operations where I need to do freehand routing, I wouldn’t dream of not using a router table. As things have progressed, I have been expecting more and more from my equipment, in their capabilities, and accuracies, and have been reaching a point where I needed to use bigger and bigger router bits, and/or a very high degree of accuracy. As I have written in another article, (which I’ll post here soon) the micro-adjusters for the Triton Router Table are excellent for achieving precise fence movements.
When using some very large router bits (such as for raised panel joints), I found that the Router Template Guide plate got in the way, so I wasn’t able to lower the bit far enough to achieve the cut that I wanted. To get around this, I had three options. The first was really not an option at all (lowering the router). The second was raising the work, which although ok, made it difficult to achieve the same setup every time (you don’t want each door on a raised panel cabinet looking different!) The final solution was to make the Triton Router Table top thicker. This had an added benefit of allowing a 1-piece top, which meant that there was no chance for the front edge of a piece of work to catch the top of the table at all, or worse, experience any dip or rise as it progressed past the router bit.
There were a few things that I demanded of the upgrade.
1. Retain the ability to use the fence, perform through-table bit changing, and still be able to use the various router table jigs (finger joiner, biscuit joiner, jigsaw table).
2. The modification must be fully reversible, which adds an extra dimension to the design.
3. The table must still be able to take a full range of bit sizes, from the 3mm Triton bit, through to panel making bits, without ending up with a huge cavity when using the smaller bits.
4. Safety must not be compromised.
My solution was to attach a new single piece of aluminium sheet over the entire tabletop, while still leaving the slot for the sliding portion uncovered, and therefore usable as originally intended. After much thought, I finally clicked to the best way to do this- attach the new top to the removable router holding plate, so that it gets removed at the same time as the router is.
Step 1
After purchasing the sheet of aluminium (3mm thick, high grade which gives a more uniform flatter surface), it is then cut to final size. I did this on the Triton Workcentre after first changing the blade to an old cheap TCT one that I had lying around. (It was actually a GMC blade from their old table that I turned into a sanding table with the Triton Sanding Disk…. how ironic!) Being aluminium, it cut easily, and although I would refuse to do this with a decent blade, it was fine with the cheap one, and no discernable damage to the blade (I’m sure it got a little blunter, but care factor?)

Photo 2 – Sizing the Aluminium Sheet
The plate is tested for size. I did not cover the entire top, as I want to retain the maximum versatility, and still be able to use the various Triton jigs.

Photo 3 – The new top in position, testing for size
Step 2
The plate is riveted to the router holding plate. Holes are drilled, and then a second, larger hole is started to create a countersink, so the entire head of the rivet is below the top of the table.


The fit is tested before the rivet is affixed. Rivets work well, as they are particularly resistant to shear forces, which is the primary one experienced when sliding work over the table past the router bit. The other benefit of rivets is that they are very easy to remove when required. Simply drilling off the top and gently tapping the body of the rivet through the hole, and you would never know it had been there (except for the hole of course!)
The rivets are then set, locking the top to the router holding plate.

Step 3
Next, the slots need to be cut for the router table fence. The bolts of the table fence are already long enough to cope with the additional 3mm of the new top.
To start the slots, I decided to drill a hole at either end. To choose the correct drill bit, I simply used the existing slot to find which bit fitted best. The hole placement was found by scoring the aluminium through the slot from underneath.

Once the holes were made, I fitted the Triton router with its handheld fence (that came with the router), and a cheap TCT 1/2″ router bit.

I aligned the router bit up with the holes drilled, and adjusted the fence so the slots will be parallel with the sizes. With the router set on its slowest speed, the slots were cut. Note the new top is held down firmly with clamps for this step. The slow router speed is a must- we are routing through metal after all.

The fence is tested in its new home. Perfect.

Step 4
The hole for the router bits now needs to be cut. I debated for a bit (no pun intended) to work out where the exact centre of the hole is, until it dawned on me that the router itself would show this. Another cheap, 1/4″ bit was set in the router, and it was locked into the tabletop in its quick release holes. This was then gently plunged until the centre was marked.

The hole is then cut. I used an old hole cutter that I had, and never bothered using (cheap & nasty from a local hardware supplier), and for this project it was perfect. It struggled to get through the aluminium, and it will be no use again (blunt!), and it didn’t so much as cut, as scratch its way through the sheet. I got my circle however!

The drill press was set on its slowest speed to make the cut.

Photo 13 – The resulting hole
Now in position, through-table bit changing is still fine, and everything lines up perfectly.
An unexpected, added bonus is now the table can use my largest bits (raised panel bit and large rounding over bit) without having to first remove the template guide plate. An added bonus, and worth the upgrade on its own!

Photo 14 – The resulting hole, with router in position
The final result!
To clean up, the top was sanded with ROS with grades 120, 240, 360 & 400. A light coat of Traditional Ubeaut wax was rubbed over the surface.
 Photo 15 – The Final Result
I have found it beneficial to make a wooden zero-clearance insert to fit into the hole, particularly when using a straight bit. The zero-clearance insert can be secured to the bench by recessing two screws into either side, and screwing this directly into the Triton Template Guide. The hole in the insert is made very easily, by carefully plunging the bit through the insert.
Removing the insert is even easier. Turn off the router, and unscrew the two screws holding the insert in place. Next, carefully wind the bit up through the table as if to change it. This will lift the zero-clearance insert at the same time.
This adaptation to the Triton Router Table has proved useful for particularly fine cuts, such as producing moldings for picture frames, and routing dovetails. To add to the adaptation, I have also modified the various table accessories to deal with the additional thickness of the Router Table.
Filed under: Uncategorized | Tagged: Aluminium, Drill Press, Mods, Raised Panel, Router Table, Tablesaw, Traditional Wax, Triton, Ubeaut |


Could you use a ferros metal base so you could use a magnet guide?
I don’t see why not – so long as you could get one that was flat enough. If you look at cast iron, then to get sufficient thickness to cope with its inherent brittle nature, you might as well go for a full cast iron table (as I have done in the end).
It all comes down to compromise, and just how much you are prepared to do so in trying to upgrade an existing tool versus upgrading it altogether.
Just what I needed. Thanks