Episode 119 Kerfing on the Tablesaw

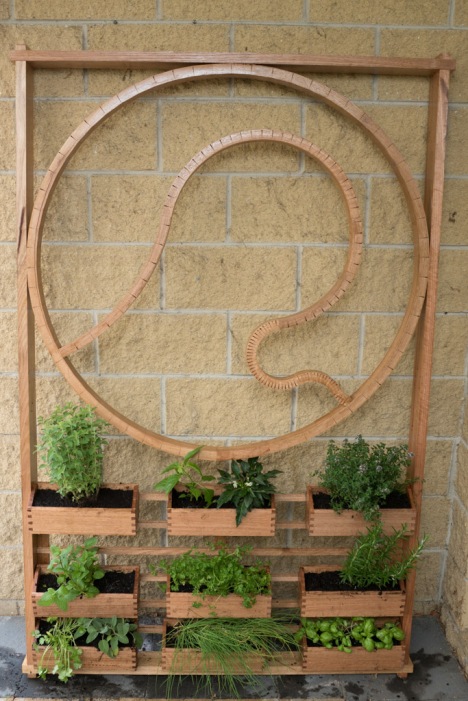
I made this video while I was creating a vertical garden for an article in The Shed magazine.

garden-1

Lost the files for a while (and forgot I had shot the video!!), but here it is at long last!

For Numismatists, Notaphilists & Coin Collectors

Here is my latest project, ready for the next edition of The Shed magazine.

Coin-1

It is a coin storage cabinet, with spaces for 1200 individual coins, stored in acrylic trays.  It has a curved top (using kerfing) and tambour door.  By replacing a 6mm thick tray with two sheets of 3mm clear acrylic, bank notes could also be stored and displayed.

Each tray has a tab with a descriptor of the tray engraved in it, such as “Australia 50c Commemorative”, and each coin slot is sized to the specific coin that it is to house.

When the edition of The Shed comes out (soon), the article goes into detail how it was made, using both CNC and non-CNC techniques.

Owl’s Life

Bit of a test day today (isn’t every day?!)  Wanted to see how some new bits from Tools Today would go with the nested projects I have been working on recently.  Today’s test was on a scary looking bit – but not scary because it was big and mean looking – quite the opposite.

This bit is super fine, and a whole 1/16″ (1.6mm) diameter solid carbide cutting tip.  It looks way too fine and fragile to use, let alone in a CNC router!  However, I wanted to see if it could work, as it is currently the largest bit that I have that will cut 3mm MDF and not create oversized, and therefore sloppy joints.  This bit in question is the 45190 Amana Tool straight cutter – 2 flute, and is not up/down or compression.

Thought it would break in a heartbeat, but hoped not.  Even so, I slowed the feed speed down to 50mm/sec.

The result?  Not only did it survive perfectly well, it cut really cleanly, and did not have a tendency to try to lift or move the MDF around, even when the distances between components was at a minimum.

I’ll get more detailed views (and video) of the bit in action at another time.  What I was left with after my testing was this fellow.  The bit performed admirably – I’m sure they have a reasonably high attrition rate, but so far there have been no dramas, or casualties.

Owl-1

Owl-2Cool little guy, and probably not far off life size!  Still I might try him in 6mm MDF next!

Episode 114 CNC Master Collection

A logical conclusion

Using the same steps discussed in the last entry, I have taken a vector drawing of a Celtic Cross (created by “CarveOne” on the Vectric Forum), and produced a 3d rendering of the design.

This is the first time I have really tried using multiple paths on the same object.

The first pass was a roughing pass – used to remove as much of the unwanted timber as possible with a strong router bit, and higher feed rates to perform the task quickly.

DSC05816For this I used the 46294 3D carving bit from Toolstoday.com  It has a Zirconium Nitride (ZrN) ceramic coating, so this bit is also appropriate for routing in aluminium, brass, copper, cast iron and titanium alloy.  It makes very short work of the camphor laurel!

DSC05818There wasn’t a lot of material that needed to be removed, but it is still a worthwhile step to minimise any unnecessary load on the finishing step (and router bit).

DSC05820The final design was then carved using the 46282 3D carving bit.  This has a 1/16″ diameter tip, so can really get into the details.  Even so, there is a bit that is even finer, if even more detail is required (with a 1/32″ round nose tip).

I was using these at around 80mm/sec.

Once the design was cut, I swapped over to a solid carbide 1/8″ upcut bit to first cut around where the gaps were meant to be inside the design, and then to cut around the outside, down to about 12mm deep.

DSC05822For a sense of scale, the cross is about 300mm high, and 200mm wide.  Straight off the router bits, there is no need for sanding where the carving bits have been.  There is a bit of feathering on the outside of the cut out, but that is both a function of the timber, and insufficient router bit speed.

I deliberately didn’t cut all the way through the timber, so there was no need for tabs to hold the cut pieces in place.

To release the cross from the surrounding material, I turned the whole thing over, then ran a basic flattening profile on the back, taking off 2mm at a time with a surfacing cutter – using the RC2248 replaceable tip cutter.

DSC05825

Once this cut down to the required depth, the cross was released.

Each project presents different challenges, so I get to know more and more about how to use the CNC router effectively, and how to incorporate it as another workshop tool.

I had a look back at some tests I did on the CNC Shark using 3D carving bits – the finish I am achieving here is chalk and cheese compared to my early experiments.  I don’t know if I can attribute it all to the platform, but having such a solid, heavy duty CNC router certainly is not harming the finish that I can now produce!


Episode 113 Spoilboard

Tambour Sun Lounge

Managed to finish off the Tambour Sun Lounge this evening – went together surprisingly quickly in the end.

It is made up of 137 individual, interlocked tambour slats, produced using the Lonnie Bird Tambour Router Bit Set from Toolstoday.com.  I made quite a few more than I needed, as I wasn’t sure how many I’d break testing the load limits, or, when I started the project, just how long a tambour I’d end up requiring.  The slats I have left over can be turned into a small drinks table, and/or a lumbar support.

I’ve now made over 300 tambour slats with this set, and it is still going strong.  This project uses approx 90 meters of slats, so if you work that out – 2 passes with one of the router bits, and one with the other, that is 270m of routing, and about the same distance again on the tablesaw, not to mention multiple passes on the jointer and thicknesser.  All in one day – over a km of timber passed through one machine or another.  I slept well that night!

I made the slats about as thick as I could manage, and still be able to slot them together.  Granted, it would be possible to go even thicker if you were prepared to make the slot on the bottom of the slat wider.  However, I tested this tambour by standing on it, on one foot.  That it survived that torture test (just) demonstrates just how strong they are (and the timber obviously).

So that’s it – job done.  The full step by step writeup will be in the next edition of “The Shed” magazine.  If you haven’t seen it yet (available in Australia and NZ, and I imagine digitally elsewhere), it is worth checking out.


One CNC Router Bit Set to Rule them All

Three Router Bit Sets for CNC hobbyists under a tin shed sky,
Seven for the 2D and 3D carvers to own,
Nine for signwriters destined to buy,
One for the Shed Dweller on his dark throne
In the Land of Stu’s Shed where the router bits lie.
One router bit set to rule them all, One router bit set to find them,
One router bit set to tempt them all and with the CNC mill bind them
In the Land of Stu’s Shed where the router bits lie.

ams-cnc-58-2

This is the ultimate CNC router bit collection that I’ve found in the latest router bit catalogue from Toolstoday.com and Amana Tool

58 CNC router bits in its own display cabinet, for CNC routing timber, MDF, laminate, plastic, aluminium, steel, foam, and composites.

That is a set and a half!

ams-cnc-58-group-revised

Drool!

Episode 109 AmanaTool Raised Panel

AGE Raised Panel Set from ToolsToday.com

A matter of scale

In Episode 107, I had a look at the Amana Tool miniature inverted copy router bits from Toolstoday.com.

Although you get an idea of the size from the video, I thought I’d give you a closer look, and compare them in size to a Australian 5c, and the USA cent and quarter.

SONY DSC

What I really wanted to show however, is the size of the bearing that is used on the smaller trim bit.  It makes for a smooth copying operation, and so the router bit doesn’t burn at the rub point.  Now when I say it is small, I mean small.  It is in that first photo – have a look at the 1c piece.  However, to make it clearer, here is a real closeup!

SONY DSC