Normally when you buy a lathe (or drill press), you look at the features, make your choice and that is it- they are the features your tool will have for the remainder of its life.
You normally would expect those features to be static, ‘locked in’ as it were. Fundamental things like torque, but also the operator interface as well, preset speeds, how you can change speeds, safety features (such as chisel dig-in detection) etc.
Not so with a DVR lathe from Teknatool. I was not aware of it, but there was an older version of the DVR lathe that didn’t have some features of the current machines, and an owner of an older one could be left wishing their machine had more of the features of the current machine. Instead of replacing the lathe with a newer model, a DVR owner can simply upgrade the control board to get the higher torque, the safety features and the variable speed selection by replacing the “plug’n’play” computer control board.
Not that I need to at the moment, as my DVR lathe has all the current features, but it is great to know that if (or rather when), Teknatool come up with smarter ways to implement the onboard DVR technology, and add software improvements (as well), that existing owners are not left behind. They can choose to purchase the upgraded control board.
You know, I get it. I can see why Marc (The Wood Whisperer) Spagnuolo has a workshop full of Powermatic. I’m sure it is all part of his huge sponsorship deal, and more power to him (pun intended), but he would also want to have the best workshop he can have too.
He may not have a SawStop, but the flame-covered tablesaw is pretty cool never-the-less.
He also doesn’t have a DVR, but I had a closer look at the Powermatic lathe today, and what a beast it is.
Not only enough cast iron for a small country, but every (moveable) component glides so smoothly.
3 phase motor, with its own onboard converter from single phase. Built-in vacuum system for vacuum chucking. A 96 point indexing system with a heavy-duty indexing disc.
What’s not to like (except the price tag)? You’d have to be pretty dedicated to really make use of such a machine, but then, it would also handle some pretty significant turnings as well.
Had a look at one of their promotional videos, just to see what it looks like in use. Yup, that is a beast! Anyone got one? What do you think? And more importantly, what have you managed to make with one?
Despite knowing the Nova DVR XP is a pretty substantial lathe, I was still a bit iffy whether the Longworth chuck I had picked up at the wood show would actually fit. It wasn’t whether it would fit and be able to be spun up – being able to turn the DVR head outboard means the lathe can mount a huge turning. The question was whether the outboard tool rest would clear the chuck sufficiently so I didn’t have to find an alternate tool rest.
I needed have worried. A 24″ chuck fits just fine on the DVR. It is too large for me to be able to use the tailstock, but that is just the price I have to pay for such capacity.
The Longworth chuck design was inspired by Mr. Longworth from the Hunter Valley Woodturning Club, NSW, Australia in 1989. One of those simple yet cool concepts (or applications of a concept) that makes you wonder why it took so long for someone to think of it.
Still, turning a bowl that then justifies having it reverse-mounted in this Longworth (at maximum capacity) would be quite an experience. Or should I say will be!
On the back is a simple metal disk to be held in the jaws of a chuck. In this case, nothing beats the power of the Titan II chuck, with the power jaws to boot. Seems fitting to use the most powerful Nova chuck to hold such a large aftermarket chuck on the lathe.
Looking forward to giving it a workout! Will need the room of the new shed however – the chuck may fit the lathe, but the combination is too tight for the current space.
Polishing can be a real time-consuming process, especially for unusually shaped items (or at least items that are not flat). You can resort to the old elbow grease and a cloth, but many solutions offer a mechanical way to move the cloth against the work.
Mounting a swansdown mop in a hand drill certainly works, and allows you to get into all sorts of places, or bring the mop to bear against a piece turning on the lathe.
What would be useful, is having a set of cloth wheels, each with a differing amount of softness so as you get softer and softer, and charging the cloth with finer and finer particles you can achieve a superb finish, irrespective of the shape or complexity.
And that is what I saw when I visited the Roving Reporter recently. And so I ordered one of my own from McJing Tools, for a whole $80.
The contraption consists of a bar with a MT2 taper at one end (compatible with most lathes and drill presses), and a dimpled end at the other that can engage with a live centre.
Very easy to mount and remove as required, or left set up if you have a spare old lathe lying around. (No, I don’t mean to say I have a DVR sitting around spare!) When I have the new shed up and running, this will likely be found mounted on a Jet mini lathe I have.
Each wheel is marked for the compound that should be used on it, and from left to right is tripoli, white diamond, and wax. (In the picture below the white diamond and the wax have been swapped). I suspect that white diamond doesn’t contain diamonds, but is a finer grade than tripoli, which makes it pretty fine!
There is no speed rating supplied for the wheels, but I”d tend to say anything over about 1000RPM is starting to push it. I tested it up to 2000RPM, and although it was fine, I suspect it would significantly shorten the life of the wheels.
There is a lock nut on one side (seen in the photo above) to stop the direction of the lathe loosening off the nut. I tried the contraption spinning backwards (reverse on the lathe), and that worked well – might source another nut so I can have a lock nut on either end, so I can go forward or reverse as a please.
I didn’t have anything particular to test it on, so I used the underside of one of my scrapers. Now I have a very shiny scraper!
Dropped round on Robbo recently, as he has been working gluing up a segmented block to turn into a table leg, and was about to turn it for the first time. An opportunity not to be missed! He didn’t do a great deal on the first day – too many competing priorities, but even so, it’s a pretty good segmented unit!
It was also being filmed for the forums, so any comments were directed to that camera.
For regular followers, you will remember my little jaunt over to the land of the red, white and blue, to Denver Colorado to appear on Cool Tools. Haven’t forgotten the experience, from the flight on the A380 to getting around Denver, being on the show, meeting and working with Chris Grundy, visiting Rockler, and, well, the whole experience.
It all jumped back in mind when I was reading up about a tool sitting out in the shed, and heard it was about to be featured on….Cool Tools!
The tool in question: the Nova Comet II midi lathe, from Teknatool.
Nova Comet II
It is a very interesting addition to the midi lineup, and simply based on name, it has quite a pedigree.
There are a few other lathes in the same niche, so lets pull them all out, dust them off and see what we have here.
Jet Midi, Variable Speed
Carbatec Midi, Variable Speed
There are others, but these are the ones I have some familiarity with.
Must admit, I didn’t have variable speed on a lathe until I got my DVR. My old Jet midi lathe didn’t have the feature. Variable speed is pretty cool, and means you can quickly change the speed to suit what you are doing at the time, rather than stopping to change the belts (or simply ignoring the speed isn’t ideal, mores the point!)
Both the Jet and the Carbatec have the variable speed tacked onto the side, as if the lathe was designed without and on certain machines they get the upgrade. For both the Jet and Carbatec, this is pretty much the case.
The Comet has it designed to be much more integrally part of the lathe from the outset. This may just be an aesthetic, but it also means there isn’t a speed control box sticking out the side. Dust does build up, and objects do fall or hit things that are sticking out.
While we are looking at it, some other specs, side by side
Specification
Comet II
Jet
Carbatec
Price
$639
$849
$799
Speed
250 – 4000
200 – 4300
250 – 3600
Swing over bed
300mm
304mm
355mm
Distance between Centres
419mm
510mm
430mm
Reverse
Yes
No
No
Weight
32kg
45kg
39kg
All have 3/4HP motors, indexing heads
So in the first rounds, the Comet II really is holding its own. Especially given the price.
There are some aspects that do come in though, and this is probably price-related. I like cams on the various movable items, and although it is only the tailstock, I would have preferred it to have been a cam.
Although the finish on all user areas is good, there are some rough castings underneath. The foundry really needs to invest in an angle grinder. It wouldn’t have been hard to tidy up the casting a bit more underneath.
Toolless access to the belt drive.
Other than those points, there are some distinct advantages too!
Reversible. The other lathes can’t run backwards! (Correct me if I am wrong (update – the Carbatec does))
Excellent access to the belt drive – much better than either of the others.
Ability to add accessories, such as a grinder (for sharpening chisels during turning)
It may be a bit lighter (weight is a bonus for lathes), but not too much so, and it does make it more transportable.
I’ll revisit the accessories when they arrive, but the concept is very interesting!
When I have a chance to really put the lathe through its paces, I will feed those experiences back. The initial testing didn’t reveal any issues.
So a very promising addition to the lineup, and at a rather cost-competitive price point! You can afford to add a Nova G3 chuck and still be ahead. Don’t forget, the 4 jaw self-centering chuck which is now the standard for wood turners was invented by Teknatool.
When you want to learn about woodturning, nothing beats getting to see how the experts do it. Those in Victoria have an added advantage, a professional woodturner who regularly opens the doors of his workshop to show individuals, and groups the secrets of turning. For those who don’t know, I am speaking of Robbo, who’s company is Cobb & Co Woodturning.
And when you see the size of his large lathe, well, this guy turns tree trunks! I also have a fine goblet that stands 3″ high that he turned during one demo, so tree trunks isn’t his only stock!
Robbo was telling me once, that when he is in full swing with the tree trunks, he has a couple of guys with shovels and wheelbarrows (and a truck out back) just trying to keep up with the wood shavings he’s making!
But it is one thing to say Robbo can spin a tree trunk on his lathe, and another thing to actually see it. So here it is:
Now what Robbo has done is produce a series of 4 videos for learners (and I definitely need to watch them all!) They are available on his YouTube channel, Ozwoodturner1
And finally, one of Robbo’s pet hates – the danger of using a spindle roughing gouge on bowls
After finding a natural barley twist while holidaying in Queensland, Geoff has sent a couple of photos in of a barley twist lathe that he has acquired (but yet to use).
It is interesting to study, just to see how simple an arrangement it is, and with a little bit of work, pretty easy to duplicate – especially (but not limited to) those with Torque Workcentres.
It would be pretty easy to add this functionality to a real lathe (but NOT switching the lathe on!!!) A lathe with an indexing ring would be excellent for this
Barley Twist Lathe
Barley Twist Lathe detail
I’m not sure the drive mechanism for this lathe – it may be from pushing the router sideways, but I suspect you manually turn the black winder in the second photo. In that photo, you can also see an indexing ring, which is essential for setting the workpiece to the next start location. Depending on the combination of how far around the workpiece is indexed, the router bit chosen, and the setting for how fast the router moves relative to each rotation of the workpiece will dictate resulting effect.
A barley twist lathe can be regarded as a glorified Beall Pen Wizard (or is it the other way around – the Beall is a miniature barley twist lathe?!)
Beall Pen Wizard
Back to Geoff’s lathe – I can’t see how the gearing is regulated, but I assume it can be changed.
So that is a barley twist lathe. Do an image-search on Google for Barley Twist will reveal over a million examples of this ornamental feature being used in different projects, with varying degrees of success! In some instances it is beautifully complementary to the overall object. In some other cases, it has obviously been included without any understanding of how such an ornate feature should be used.
I had an opportunity today to actually take the simple steps to upgrade my DVR to wireless. Given my DVR came out before the wireless upgrade was available, it also needs the additional retro kit, which involves replacing the front panel (and one of the circuit boards within).
Nova DVR XP original head
The DVR is quite an amazing lathe – with the motor contained directly in the head of the lathe and with direct drive and computer speed control, it is an impressive arrangement. Expect to see DVR motor technology utilised in other machines in the not-to-distant future.
Control panel
On new DVRs, the control panel is already wireless-ready, but it still needs an additional circuit board added. These instructions are relevant for both the wireless-ready, and the retro kit required lathes. Some steps are not relevant for both obviously – will point them out as we progress.
Step one is turning off, and unplugging the lathe. You need to leave it at least 2 minutes for the circuits to fully de-energise. (The video by Teknatool suggests 5 minutes)
Loosen screws to release the control panel
Loosen the four screws on the sides of the panel. They can be loosened, or fully removed (doesn’t matter which). The panel is then gently rocked free of the lathe. It still has a cable connecting it to the lathe, so be careful!
The motor control cable
This cable can now be disconnected. Note which way around it goes (the red wire is always the #1 wire fwiw). In this case, the #1 wire is towards the top of the control box. The connector also has a tab to ensure it is returned the correct way up, but it is always good to keep track of the ribbon orientation as well. It may be held in place with a dab of hot glue – easy enough to pick off with your fingernail.
Panel removed
Lathe looks a little strange with the panel removed – this is an aluminium plate affixed to the front which is used to secure the panel.
Wireless control with associated circuit, and retro kit
On the left is the remote control. In the packaging, there is also a small circuit board that is paired to the control. This is the wireless receiver. (I’ll cover what to do if it is not paired further down)
On the right is the retro kit. This is only needed for older DVRs as mentioned (pre August 2011). At this point, those with a wireless ready DVR can skip ahead – we will get back to steps that are relevant to you in a sec!
Glue blob
Near the #1 wire here, you can see the hot glue blob that is used to ensure the cable doesn’t detach over time. When unplugging the ribbons, you need to first pick off the glue blob.
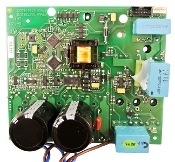
Removed circuit board
The main circuit board is fully unplugged, then unscrewed.
Original circuit board attached to retro kit
This circuit board is then screwed to the same location on the retro kit panel (using the same screws).
So about now, DVR wireless ready owners can rejoin the party 🙂
Adding the wireless receiver
Next, the wireless receiver is pushed onto the pins that the circuit ribbon was removed from (the one I am holding). Clever concept of how to add it into the circuit to be honest. Very cool.
Connecting the circuit ribbon
The circuit-board ribbon plugs into the top of the wireless receiver. You can see how the design is working at this point – the top PCB (printed circuit board) is the one with the display, the on/off and speed controls. It passes directly through the new wireless receiver so the original controls work exactly as they used to. However, the wireless receiver can receive instructions from the remote, and input them as if the relevant buttons on the front panel were pushed.
Attaching the ribbon, part A
Attaching the ribbon, part B
The ribbon is connected – the new version of the controller has a ribbon with an additional plug partway along. This connects to the wireless receiver, and then the lower PCB. Take careful note of the #1 wire (the red one). It can be attached to the wireless receiver either way, but only one way will work. The #1 wire needs to be towards the long side of the wireless receiver PCB.
Connect the motor control ribbon
Connect the motor control ribbon, then screw the whole control panel back to the front of the lathe. You may discover that the remote is not paired to the wireless receiver (as was the case with my kit). It is a very simple step to rectify. Turn on the lathe (before the panel is screwed back onto the lathe). Once it has gone through its bootup, try the remote. To turn the lathe on, hold the start/stop button for 2 seconds. If this does not start the lathe, it is likely that it is not yet paired.
To pair the transmitter and receiver, with the lathe switched on (but not running), push the pairing button on the wireless receiver PCB.
Pairing button
The pairing button is the little white one just above my finger in the photo. Then within 60 seconds, push the power button on the remote. You will hear some beeps, and then the two will be paired together. Try to run the lathe again with the remote, and it should now work.
Screw the control panel onto the lathe, and enjoy giving the lathe a run remotely!
Ready to run…. remotely!
All attached, and first tests went well- namely using the lathe as it was originally, starting, stopping and speed control from the control panel. One (minor) advantage of transferring the common circuit board from the original panel to the retro upgrade panel is all my preset speed settings were remembered.
Now with the remote control (either wrist-worn, or magnetically attached somewhere convenient), the lathe can be started and stopped from up to 7m away, and can be increased or decreased in speed in 10 RPM increments (initially). The manual suggests the increments are 10-15 RPMs at a time, and it seems it depends on from what speed setting you are altering from. Low RPMs, the increment is 10 RPM, high RPMs, seems to be increments of 15. If you hold one of the speed-change buttons down, it behaves the same as if you held down the speed change button on the front of the lathe – the changes are slow at first, then increase in the amount of change (ie you can initially see the changes are 10 RPMs, but it soon becomes 100 RPMs at a time, so you can quickly accelerate up to the lathe’s highest speeds (or decelerate from there) by holding the speed change button on.
It is important to note what manual number you get with the kits. If they are the 119-0811-001 manuals (as mine were), these are incomplete and have errors. Teknatool R&D have produced a much better version of each manual, with a much clearer documentation of each step, using actual photos. I have included the latest versions (as of when this article was written) here as PDFs.
Now I don’t know if I will always use the remote – possibly not to be honest. If I am working near the lathe head, and have easy access to the control panel I will still use that. However when working away from the control panel (or when I would have to reach over a spinning workpiece to reach the controls, such as outboard turning), then the remote will be a god-send. Kinda fitting, considering Teknatool and Nova come from Godzone!
I would think this remote would be useful for instructors as well – with a younger, or less confident operator, the instructor will have the ability to remote-stop a lathe without having to hover near the control panel.
Also too for experienced operators wanting to spin up something out of balance, or possibly compromised with hidden flaws and defects. Instead of turning on the lathe and hopefully standing out of the line of fire if something lets go, you can stand well out of the line of fire, and even at a safe distance to test the integrity of a new piece of timber.
So a cool upgrade, and easily fitted to an existing DVR XP, whether or not it is already wireless-ready.
Teknatool produced a YouTube video of the upgrade, which can also be watched below:
Flicking through Twitter (using Flipboard on the iPad fwiw), saw a link on NOVA Woodworking’s account (@novawoodworking) about a free project plan download. Following the link took me to their latest newsletter, and there I saw some strangely familiar words. They sounded familiar that is, and being that they were mine, that shouldn’t be a surprise!
My article on the remote control for the DVR made the e-newsletter! Way cool 🙂 Now I better hurry up and write the full article on actually fitting (and using) the remote control to my DVR XP!
And if you found Stu’s Shed via the newsletter, welcome 🙂
Guess that is how “Angry Simon” (aka Simon Guillot) found my site, and my associated Facebook account, and decided a long, ALL CAPS tirade was applicable. Knob.
To everyone else, welcome! There are a number of articles on this site about the very cool DVR XP, and many more to come. Got to love kiwi engineering.