Mindfulness and the workshop

Circle around various corporate entities, and you’ll find the term “Mindfulness” cropping up more and more, as the latest trend takes increasing hold.

Now I say that in somewhat irreverent terms, but without any real intent.

I am not really on strong terms with mindfulness yet, there are many long courses all about it, but what strikes me early, is this concept of being in the moment.

Many of us drive to work each day, and yet can’t remember how we actually got there. We are walking around the house, put down our keys, and cannot remember for the life of us where they are a little later on.

These (and many others) are perfect examples of taking actions without being mindful.  Being in the moment, actually tasting the food we are eating, focusing on the activity, being particularly aware of what we are doing, not just going through the motions without concentration, without being mindful.

It got me thinking about the shed.  Some of what we do out there is without real thought – cleaning up for example, yet daydreaming (or just not concentrating).  Yet a lot of what we do, especially while working in the shed had better be very mindful, or you might find yourself fingerless, or worse.

To turn that around, I find that the shed activities really do focus the mind.  You cannot have random thoughts bubble up and become a distraction, and the activities really allow you to concentrate intensely on the task at hand.  It is like a form of meditation, and why I find I feel really refreshed after a good session out in the workshop.  Better than sitting around with your eyes closed, focusing on breathing and saying “Om”!

When I am shaping wood, solving design questions, cutting, planing, joining, gluing, polishing, there is no room for abstract thoughts, distracting thoughts, and problems at work and other stressors do not get a look in.

That is not always the case unfortunately. When having an unsuccessful day, it either allows an opportunity for these external pressures to creep in, or it is because those external pressures have been there all along, and not shut down enough to allow a successful day.

The next time I am having a bit of a bad shed day, I’m going to focus a bit more on why – am I being distracted by thoughts, or just me having a bad woodworking day.  Of course, like the golf saying goes, a bad day in the shed is still better than the best day at work!

Stu’s Fair Dinkum Shed, 12 months on

But first, a bit on the past year to start.  After a promotion at work, time became even shorter than normal, which was reflected in the posting rate – especially in the second half of the year.  Hoping to improve that this year, and although I don’t expect to be able to achieve a post a day (which would be ideal!), I still hope to achieve at least 200 posts throughout the year, so something like 2 in every 3 days or so.

I still have two magazines to feed content to, so if you want some of the longer, build-oriented articles, they are in the pages of ManSpace magazine, and The Shed magazine.  There will still be build articles here as well of course, but magazines do add to the cash flow 🙂 Videos on the other hand are still the forte of the web, and what this site was originally set up for.  I am expecting a lot more video content to be made available this year, especially with the increasing maturity of my setup.

The main improvement that I want to bring in this year is video lighting.  The setup has good audio and video capture (2 cameras, plus a GoPro, and 2-4 Rode mics), but the lighting is yet to be addressed.  Stills photography is as well taken care of now as I can afford – decent 24MP camera, Zeiss lens and top of the line flash, but this will not be so apparent in the web content (99% of that resolution goes to waste on the web!)

And so to the shed.

It has been a really big 12 months, being just past the first anniversary of the new shed.  I thought I should look at the shed itself, and how it has held up in the first year.

The construction was completed 12 months ago as I mentioned, and before any equipment was moved in, the floor was given an epoxy coating using Shield-crete from Globak Woodcare.

Shed-12

So what do I think, 12 months on?  Other than the above photo having quite a bit of surface sawdust from a current project, the floor still looks awesome.  It has held up excellently, despite having heavy machinery dragged over it, things dropped on it, spilled on it, glue dripped on it.  Sure there are some marks on the surface where I have dragged large machines, but I could probably scrub them off if I could be bothered (it is a shed floor after all).  A few scratches that no surface would have resisted (not that I remember where they are, and they are not apparent even so), and a couple of areas that are chipped, but that is because what fell damaged the concrete underneath.  The surface itself is still fully adhering to the concrete, so my preparation and application was obviously appropriate!

In hindsight, I might have used a few less of the paint chips (my application wasn’t as even as I should have been), and I would have used a bit more of the antislip in the glaze finish.  In saying that, the surface is fine underfoot whether clean, dusty or wet.  Keeping it clean is easy, either with the dust collector, or a compressed air sweep (or the occasional broom). I might have gone with a darker shade, but that is purely aesthetics.

The shed construction has held up to the first 12 months without an issue – it is every bit as robust as it looks.

Shed-10 Shed-15

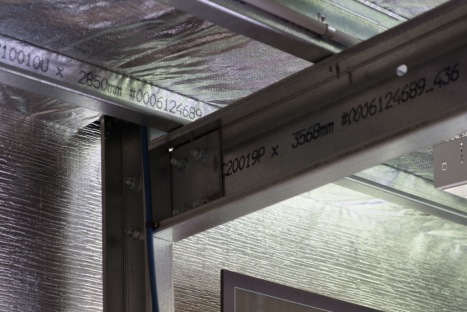
Those beams are solid!  The shed has had a few high wind days – not enough to really put it to the test, but there have been no signs of issue with what it has survived to date.  It is a superb structure – puts those lightweight sheds right in their place.  Granted there is a significant cost difference.  It is worth it.

The mezzanine has worked out well too – I haven’t managed to collapse it, and it is still storing a lot of gear up there.  No, sadly, I still haven’t finished unpacking.  That will be a work in progress for the next few years I suspect!

Shed-5 Shed-8

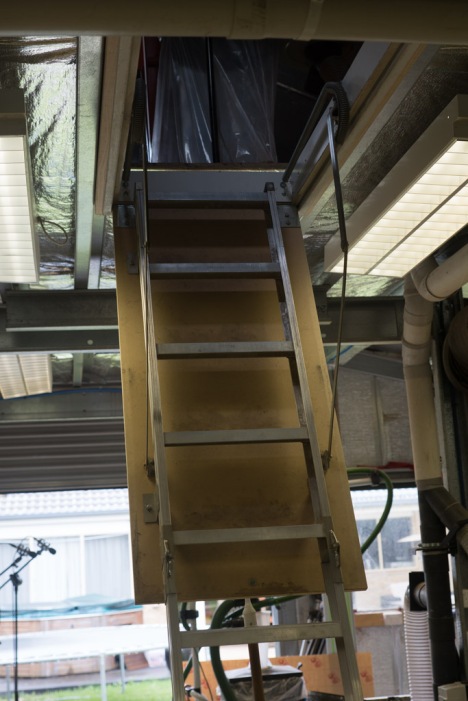
The attic stairs have been a good decision, as well as the crane and hoist.  I still need to lower the stairs a couple of inches – I’ll get to it one day.  Having a good amount of storage space has helped keep the main shed floor clear and available for the working machines.  Having a wood store alongside has been great as well, and although having access from inside the shed would have been better, it is a working solution.

Insulation.

Having a shed with insulation is significantly better than one without, but still, on particularly hot and or humid days, it is not the nicest place to work.  The standard insulation could really do with being kicked up a notch, or three.  I’m hoping to get some air con working in there at some stage, as well as a working pot belly for winter.  The temperature extremes (not that they are exceptionally extreme in Melbourne) is enough to be detrimental to the shed experience, so more work required in that area.

It really wasn’t installed very professionally – rough and messy at the edges, and the tape was slapped on rather than applied properly, so that has been coming adrift in places during the year.

Lighting.

As much as possible, and then add more.  The lighting I have, which is a really comprehensive grid of fluoros (2 per unit) is only just sufficient.  Once I replace the tubes I should get a better result.  Not that what I have there isn’t good, but there is room for improvement.

There are two areas where the design and/or construction is less than perfect.

1. Water leaks.

The windows on the mezzanine, and the roller door both let water in.  While the roller door could have been improved by having the slab slope away from the door, it would have been too risky to have that done before the shed went in, in case it wasn’t quite in the right place. I could grind it away after the fact, but a. it would look messy, and b. it would wreck the floor coating.  The bottom of the door doesn’t seal sufficiently against the concrete, especially in the corners.

The mezzanine windows are more of a problem.  Whether they are not well made, or not installed correctly I don’t know to say.  But any half decent rain with a bit of wind, and there is a bit of a waterfall.

Possibly the gaps have something to contribute.


Shed-3

Not very clear in the photo, you can just see light coming in at three of the five corners, and the other two are not immune either.  I have to silicone them up.  In saying that, I now do remember that I wasn’t confident on how the top corner of the roof ridge was finished, rain might be coming in there and running down the insulation, making the window look like it is leaking.  Again, it all points to poor assembly.

Shed-13

The other area that should be better is

2. The door.

Shed-14

I added the insulation to the door btw, which was a good move.  Not only decreasing a significant amount of heat that was coming through the door, but also makes it sound a lot less tinny when it shuts. (I would like to stop so much heat coming through the roller door too, if I knew a solution for that).

The door though – the lock/handle mechanism comes loose after a time, needing to be tightened.  And the door scrapes more and more over time on the jamb.  This is most likely because the frame holding the door is too flimsy, and bends a bit more each time the door is opened, especially if opened too far.  There is no active stop on the door to prevent it opening too far, putting pressure on the hinges and the surround, nor is there anything to stop the door slamming shut if blown by a light breeze.  Both of these can be rectified obviously.  But it should be part of the design, not an aftermarket feature that needs to be added.  Given the quality of the rest of the build, this is a small area which lets the otherwise near perfect score down.  Still, the door is 1000% better than the tin shed doors on the clip-together sheds that are out there.Shed-11

Extra features added:

Compressed air – RapidAir setup from Professional Woodworkers Supplies.

Having air piped all around the workshop is awesome.  I never have to think where the closest air supply is – they are all to hand anywhere in the workshop.

The system does bleed a tiny bit of air, so when charged it does add a tiny amount to the background noise, and it doesn’t stay fully charged without the compressor topping up the pressure occasionally.  Not a big problem, unless I forget to turn off the air compressor – sure the neighbours love to hear it kick in, in the middle of the night!

Electrical

People scoffed at the number of GPOs I put in.  Not only have I been vindicated, in a couple of areas I could do with even more!  The shed needed the number of points I put in – it was not a wasted effort (or money).  A couple more 15A points would not have gone astray either. (And although I still would love to have 3 phase, it isn’t proving a particular restriction, although I have had to let a couple of machines pass me by that would have been great purchases)

Dust Extraction.

Shed-9

The system seems to be working ok – manual blast gates are ok, and a lot cheaper than an automated system, but it is an extra step that has to be set up each time a machine is used.  Having the extractor on the mezzanine is also ok – it is causing quite a dust issue up there from a few leaks that have happened, so containing the extractor would still be a good move.  It is still in the way a bit of the stairs, and 2HP is underpowered for the size of the runs I have.  But it is coping to a certain degree – filled another bag just with the work done yesterday and today, so at least that is sawdust that is not all over the shed floor.  A bigger extractor would be preferable.

There are still areas needing improvements out there – a long (never ending) list.

The main ones (that I can think of at the moment):

Sell the TS10L tablesaw.  It is in the way, and not being used.  Same with a few other items, such as a Triton Router Table and some other Triton accessories

Upgrade the drum sander

Upgrade the drill press

Upgrade the linisher/disk sander

Add a spindle moulder

The Triton routers (primarily the one in the router table) could do with an upgrade at some stage.  Initially, the speed controller is pretty much dead and needs replacement.

Create a blade storage (tablesaw and bandsaw blades)

Shed-6

Make a better clamp storage

Shed-7

Find a more permanent home for the 3D printer, and the soon to arrive (hopefully!) CNC router

Shed-2

All in all, the shed is very functional, and plenty of things are being made out there, never as often as I’d like, but I can create something in a weekend pretty easily, from toys to furniture and everything in between.  And after all, a shed is a living space.  The day there is not something to improve, change, add, is the day the door is shut and locked forever.

The other addition 12 months ago was the SawStop tablesaw.  What an amazing machine that is.  The build quality is superb, it is a pleasure to use (and I just ran another 1/2 a km of timber through it today), and still that safety mechanism sits there quietly in the background.  I have the wheel kit to add to the saw which I really need to do asap, and I have one of their titanium blades to try out as well.  I definitely want to add the overhead dust extractor to it, and I can’t wait for the sliding table to become available!  Could have really used it today.

Saw-1

So that is the Fair Dinkum shed, 12 months on.  Overall, it is a solid tick of approval.  The shape works, even though it was a compromise for the shape of the block of land.  More floor space is always better, but that is always the trade-off. The mezzanine is a definite boon, and has really contributed to the shed remaining functional.

Shed-1A great home for Stu’s Shed.

Here’s to 2015, and what should be a great year ahead!

Classic House

Watching an old episode of “House” and came across the following quote.  Seemed too good not to share!  From the episode “Clueless”, Season 2.


[Wilson is flipping through House’s TiVo selections]

Dr. James Wilson: Now, why do you have a season pass to The New Yankee Workshop?

Dr. Gregory House: It’s a complete moron working with power tools, how much more suspenseful can you get?


Ah, the good old days, when there was still some woodworking content on the pay-TV channels.  Seems to have taken a bit of hiatus.

Speaking of having taken a hiatus, things have been a bit quiet around here as well. Short story is simply – I needed a bit of a break.  Getting to the end of the year is always a real push, and last year was certainly no exception, and when it all piles on, the website gets squeezed for time and mental space.

After the typical chaos of Christmas, the family headed to Echuca-Moama for a week, which has been a chance to recharge the batteries somewhat.  43C days are not always the most relaxing, but the time out was good.

Been out in the shed this afternoon, blowing out some figurative, and literal cobwebs.  A combination of getting the tools working, and the grey tool between the ears.

I was making some test pieces for the next “The Shed” magazine article that I will be working on over the next 3 days. It involves a particularly long tambour door in a rather different way (as in, it is definitely not a door, nor is it designed to slide!)

And time for a reflection on the past year in the new shed.  Yes, it is 12 months ago today that construction of the current shed was finally completed!


Shed Magazine Oct/Nov 14

The latest issue of The Shed magazine has just came out

Oct___Nov_2014_542b58d992296

and it includes my take on a mobile device charging station.

FirefoxScreenSnapz002

From The Shed website, a sneak peek (there is a bit more than this screen shot on their site), but if you want the full 9 page article, check out your local newsagent.

FWIW, the workgear seen in the article is the Mascot gear from Proskill that I picked up from their stand at the recent Home Ideas show.

Dusting up a storm

Some further thoughts and developments on the dust extraction system.

I’ve been giving some thought to what happens next – as in how does the dust run get to the dust extractor, and just how far that is – how much more length, how many more bends are required.  The simple answer is “too far and too many”.

Hmm. So the question arose in my mind again – just why did I think the original idea of having the dust extractor on the mezzanine floor was a bad one?  Back in mid Feb, I had thought about it, and opted to bring the dust extractor back down from the mezzanine where it had just been put (and what a pain that was!)  However, now that the machine positions have settled, it is really looking like the mezzanine was a good idea after all.

Looking back at my earlier musing on the subject, I highlighted good points to be
a. free up workshop floorspace
b. for it to be inside the main shed, as it draws a lot of air, and if outside the main shed, that is a lot of hot (or cold) air that would be drawn into the workshop, and
c. as that would make it generally central to the machines it is drawing from.

On the other hand, I had thought having it in the timber store next door gives better access, better noise separation, better workshop air quality (particularly on the mezzanine).

Now that I have been working in the shed for over 1/2 a year, more informed decisions can be made.

These lead to the following justifications for relocating the dust extractor back to the mezzanine:

1. Significantly shorten the length of ducting, and minimises the number of bends required.
2. Noise isolation would be the same as having the dust extractor in the area I currently have placed it.
3. Dust isolation from the main shed is maintained, although the mezzanine will not be as clean, it is not used as I was anticipating. If I ever do start to make use of it for something other than storage, I can look at physically isolating the extractor at that point. It still has a pleated filter, and I can still run an air filtration system up there if I choose.
4. It does not draw air from the outside (hot or cold), so running the dust extractor will not significantly impact on the shed environment
5. Changing bags is as easy (if not a little easier), and I do have the hoist to remove full bags from the mezzanine.

To compare the two locations, let’s take the biggest producer of sawdust in the workshop (which also produces the heaviest particles), being the thicknesser.

With the dust extractor outside in the side shed, it would involve approx 12m of ducting (up, across and down), and a total of 6x 90 degree bends (each elbow is estimated to be the equivalent of 2m of straight pipe), so a total of 24m equivalent length.

With the dust extractor on the mezzanine, it would involve approx 4m of ducting and a total of 4x 90 degree bends (at worst), giving a total of 12m.  That is one significant saving to be had, for the machine that needs the most drawing capacity.  All other machines benefit to lesser degrees, but each ends up saving about 10m in equivalent straight pipe length, if not more.

So I guess that makes the decision an easy one.  The ducting is a lot less complicated, and shorter.  There is power already available (I originally placed a GPO up there to be dedicated to the dust extractor).

The future plan will be to look at continuing to improve and upgrade the dusting system – moving as much up to 6″ ducts as possible, rather than the current 4″.  But let’s see how the system works once I get it up and running, to see just how much that will be a priority.

Onwards and upwards (quite literally!)

Things get worse before they get better

The workshop certainly is an apt demonstration of that point at the moment!

Started off the weekend with the workshop being a little messy, after last week’s rush build to get the magazine articles finished.  Ended the weekend with it looking like a bomb site.

So what went wrong?  Nothing!

It was just time to finish off a job that I started almost two years ago, and has been notably absent from the current workshop: a fully functioning dust extraction system.

For the past 8 months, I have been working with a flexible hose running from the dust extractor, through a door and across the floor to whichever machine I am using at the time (although primarily focused on the jointer and thicknesser, so the other tools have been venting free).

Decided this weekend to do something about recommissioning a fully laid out system, given the machines seem to have migrated to relatively stable positions in the workshop.

Photo 14-09-2014 21 58 38

I’ve had all the odd lengths of pipe, tube, hose and fittings sitting aside from the previous workshop (and the collection above is a small portion of what came out of the previous shop), so that is where I started – working on the complex areas of the dust extraction.  The combined area around the tablesaw, jointer, thicknesser and bandsaw, which are all in close proximity (particularly where the dust ports from each machine are involved).

Photo 14-09-2014 21 57 35 Photo 14-09-2014 21 57 44

It took a bit of trial and error, but I am pleased how it came together.  It is a bit hard to show it looking anything but a mess, but it looks better than the current photos!

One day, I’d be tempted by the metal dust extraction system, but that is an upgrade for the future (if ever).  At the moment, simply having each machine connected to the dust extractor, with blast gates isolating each is the plan.

So far, the bandsaw comes in the bottom (with two hoses, one from the bottom of the bandsaw, and one from just beneath the table), then the tablesaw.  I haven’t worked out how I want to have the tablesaw dust guard connected in yet, but I am still thinking the genuine SawStop solution looks to be an attractive option.

Overarm-dust-collection-TSAODC

There is a port visible that has nothing connected – I have placed a quickconnect port on there, so can easily connect the super-flexible hose with the floor sweeper when I do need additional cleanup.

I have the run overhead towards the dust collector, but that run isn’t finished yet.  I still need to drop it down, past (and pick up) the outlets from the second bandsaw, drum sander and Torque Workcentre.

Photo 14-09-2014 21 57 58

The run continues to the other side of the shed, then drops down to the router table and drill press.  The run then continues (smaller diameter) to the Kapex

Photo 14-09-2014 21 58 09

Still to work out how I am going to pick up an outlet near the lathes, I might have to cut into the run I have just completed by the looks.  Oh well, better done as right as I can.

Some work still to go – another day should knock it off, so long as I have all the parts I need (so better I plan ahead).


SSYTC067 PA Doors

Episode 103 Shed Tour

Finally!  A tour of the shed, warts and all.  It is still a work in progress, but I guess, it will always be somewhat of a work in progress!

One down, one to go

Sold the Torque Workcentre (Router Master) today, which is a good step (goes towards paying for some of the shed electrical installation!), so just have the tablesaw to go.

And I do need it to go – it is taking up precious space, as much as it is a reluctant sale.  (I really do like the TS10L).  However, it is what it is.

Hopefully as a bit of encouragement, I have taken 10% off the asking price, and set it to a very round $2000. See here for more details.

Photo 6-06-2014 17 32 31

Best made plans

I love it when a plan comes together.

Even better, when by some fluke, a plan formulated on the computer (such as the floor plan) actually works in real life too, as well as it suggested it would.

Moved the 4 machines around (tablesaw, 17″ bandsaw, jointer and thicknesser), and they all came together.  I did realise one thing though.  It is the end of the era for mobile bases in my workshop.

Mobile bases are really useful under the heavy machines in the shed.  Particularly when you are a sole operator, and especially when space is restricted.  A mobile base allows machines in sub-optimum position when stored to be moved out for use, then pushed away again.  I’ll still have a wheeled option for the thicknesser (it is built in), and for the tablesaw as well (when I upgrade it to the original built-in option).  The other machines though are another matter.

As I was sorting out the layout (and thank goodness for mobile bases at that point!), I found as I was finalising the locations, the bases were really restricting how well they each fitted together.  Once removed (from the bandsaw and the jointer), it was a whole different story.

I’m not against mobile bases – I have been using them successfully for years.  But I am also looking for to not needing them either.  I have more workshop room than ever, and with the layout compromised with them in place, I’m just as happy not to continue with them.  They do make a machine more unstable, and I could, if I become really confident with the layout, actually bolt the machines to the slab.  Now that is a big call.

Tempting though.  A really solid operating platform.

I may hold off on that for a while though – previous experience shows that I tweak the shed layout a dozen times a year, every year!